Thursday, February 10, 2011

Redirect requests to non-www to www


Masuk ke cpanel
Cari file .htaccess
Edit dengan filemanager di web.

Copikan script berikut ini :

# Require WWW
# Will automatically redirect requests to non-www to www
# This will exempt robots.txt for search engines

Options +FollowSymLinks
RewriteEngine On
RewriteBase /
RewriteCond %{REQUEST_URI} !^/robots\.txt$
RewriteCond %{REQUEST_URI} !^/sitemap\.(xml|xml\.gz)$
RewriteCond %{HTTP_HOST} ^([^.]+)\.([^.]+)$ [NC]
RewriteRule ^(.*)$ http://www.%1.%2/$1 [R=301,L]

Semoga berhasil. :)

Friday, October 15, 2010

Configure a Windows Server 2003 VPN on the server side


Sometimes, simplicity is the best choice for both a technology solution and the corresponding tutorial that explains how to use the new solution. In this document, I will provide a clear, concise, systematic procedure for getting a Windows Server 2003-based PPTP VPN up and running. I'm using Windows Server 2003 with Service Pack 1 for this guide.


See article : http://techrepublic.com.com/5208-6230-0.html?forumID=101&threadID=216813&start=0

Thursday, October 14, 2010

Mengatasi Cannot load mysql extension. Please check your PHP configuration waktu buka PHPmyadmin


Berikut cara mengatsi "Cannot load mysql extension. Please check your PHP configuration" pada PHPmyadmin :


1. Stop apache dan my Mysql
2. Cari file php.ini di windows biasanya di C:/windows
3. Buka file php.ini
4. Cari : extension_dir = "./"
5. Ganti : extension_dir = "./" Menjadi: extension_dir = "c:\appserv\php\ext"<-- c:\appserv adalah lokasi file appsev anda. 6.Cari ;extension=php_mysql.dll dan hilangkan tanda ; hingga menjadi extension=php_mysql.dll 7. Simpan dengan menekan ctrl+s 8. Jalankan start Apache dan MySQL.


Sumber : http://cak-win.blogspot.com/2009/02/cara-mengatasi-cannot-load-mysql.html

How To Set Up an FTP Server in Windows Server 2003


Install Internet Information Services and the FTP Service

Because FTP depends on Microsoft Internet Information Services (IIS), IIS and the FTP Service must be installed on the computer. To install IIS and the FTP Service, follow these steps.

NOTE: In Windows Server 2003, the FTP Service is not installed by default when you install IIS. If you already installed IIS on the computer, you must use the Add or Remove Programs tool in Control Panel to install the FTP Service.

1. Click Start, point to Control Panel, and then click Add or Remove Programs.
2. Click Add/Remove Windows Components.
3. In the Components list, click Application Server, click Internet Information Services (IIS) (but do not select or clear the check box), and then click Details.
4. Click to select the following check boxes (if they are not already selected):
Common Files
File Transfer Protocol (FTP) Service
Internet Information Services Manager
5. Click to select the check boxes next to any other IIS-related service or subcomponent that you want to install, and then click OK.
6. Click Next.
7. When you are prompted, insert the Windows Server 2003 CD-ROM into the computer's CD-ROM or DVD-ROM drive or provide a path to the location of the files, and then click OK.
8. Click Finish.

IIS and the FTP service are now installed. You must configure the FTP Service before you can use it.


Configure The FTP Service
To configure the FTP Service to allow only anonymous connections, follow these steps:

1. Start Internet Information Services Manager or open the IIS snap-in.
2. Expand Server_name, where Server_name is the name of the server.
3. Expand FTP Sites
4. Right-click Default FTP Site, and then click Properties.
5. Click the Security Accounts tab.
6. Click to select the Allow Anonymous Connections check box (if it is not already selected), and then click to select the Allow only anonymous connections check box.

When you click to select the Allow only anonymous connections check box, you configure the FTP Service to allow only anonymous connections. Users cannot log on by using user names and passwords.
7. Click the Home Directory tab.
8. Click to select the Read and Log visits check boxes (if they are not already selected), and then click to clear the Write check box (if it is not already cleared).
9. Click OK.
10. Quit Internet Information Services Manager or close the IIS snap-in.

The FTP server is now configured to accept incoming FTP requests. Copy or move the files that you want to make available to the FTP publishing folder for access. The default folder is drive:\Inetpub\Ftproot, where drive is the drive on which IIS is installed.

Source : http://support.microsoft.com/kb/323384

Monday, May 24, 2010

How to Send SMS using Java Program

How to Send SMS using Java Program

Photobucket

Hi, judulnya inggris tapi contentnya bahasa Indonesia. Biarin ah yang penting daripada pusing – pusing ngerjain tugas akhir ga kelar – kelar bikin program kecil untuk kirim sms dengan java.
Karena selama ini aku bikin sms gatewaynya pake Visual Basic 6.0 mau coba-coba gimana rasanya kalo pake java. Memang agak ribet sih, harus copy sana – copy sini komponennya tapi lama-lama mengasyikan. Okelah kalo begitu…
Langsung ke topik saja deh.


1. Download doeloe komponen Java(tm) Communications API Win32 di sini.
2.Jangan lupa baca Readme.html nya. Di situ akan di jelaskan langkah-langkah di mana file-file tersebut akan di copykan.
3.Setelah selesai download dan copy sana - copy sini download program dan source nya di link bawah ini

Untuk Aplikasinya
Untuk Source Code

Semoga membantu ya..

Thanks to :
1. http://www.java-samples.com/showtutorial.php?tutorialid=22
2. Netbeans
3. Java(tm) Communications API Win32

How To Send SMS With Siemens C55 and AT Command


Short post saja kok..


Download source code : http://www.ziddu.com/download/8090908/src.zip.html

Monday, May 03, 2010

Oracle Database 10g Express Edition Tutorial!


Lagi - lagi Oracle...
Hanya sedikit share dan memberikan link untuk download tutorial oracle Database 10g XE.
Silakan berkunjung ke sini. dan untuk download tutorial nya ada di sini


Setelah membaca tutorial ini di harapkan kita akan tahu bagaimana :
1. Install Oracle Database 10g Express Edition
2. Access the Oracle Database Home Page
3. Manage Database Objects
4. Access and Manipulate Data
5. Create an Application using HTML DB 2.1
6. Add PL/SQL Functionality to an Application
7. Administer and Monitor the Database
8. Create an Application using Visual Studio .NET
9. Create an Application using PHP
Selamat mendownload ya...

Panduan Menginstall Oracle Database 10g Express Edition


Ini adalah versi oracle yang gratisan. Lumayan buat nambah - nambah pengetahuan tentang oracle. Bila ingin mendapatkan installer Oracle Database 10g Express Edition silahkan download langsung di sini. Tapi harus register dulu baru bisa free download.

Kita mulai saja langkah-langkahnya.

1. Buka file installernya, setelah itu akan ada tampilan seperti di bawah ini.
2. Di License Agreement, Pilih I accept Selanjutnya tekan tombol Next maka tampilan berikutnya akan seperti ini.
3. Jika ada pilihan port, keterangannya adalah sebagai berikut
>ini adalah port default values yang ada di installer oracle 10g
1521: Oracle database listener
2030: Oracle Services for Microsoft Transaction Server
8080: HTTP port for the Oracle Database XE graphical user interface
4. Di Specify Database Passwords , masukan dan konfirmasi password yang akan di gunakan unutk username SYS and SYSTEM database accounts. Selanjutnya tekan Next.
5. Di jendela Summary , review kembali instalasi settings, dan jika sudah benar semua klik Install.
6. Di jendela InstallShield Wizard Complete , menampilkan Database Home Page, klik Launch the Database homepage lalu tekan Finish.
7. Selesai
Selanjutnya akan kita bahas untuk bagaimana cara menggunakan Database Homepage di oracle 10g.

Tambahan lagi untuk download yang bisa di gunakan di Debian, Mandriva, Novell, Red Hat and Ubuntu download di sini

Tuesday, June 16, 2009

PC Activity Monitor Professional 7.6 Full Version Download!


PC Activity Monitor Professional 7.6 | 3.6MB
Professional monitoring and surveillance software of PC Activity Monitor series (PC Acme Lite, PC Acme Standard and PC Acme Professional) is ultimately invisible and undetectable easy-to-use software for both individual and networked PCs working under Microsoft Windows 2000/XP.

These products support UNICODE, so they are able to record
even hieroglyphic writing, like texts in Chinese, Japanese, Korean. Another strong side of PC Acme products is their nonsusceptibility - they are completely hidden, and even an experienced user cannot locate, stop or destroy these programs.

Code :
http://rapidshare.com/files/244498746/PC.Activity.Monitor.Professiona.rar

Monday, June 15, 2009

Kirim dan Terima SMS dengan nokia 6235 AT Command??


Ternyata susah juga nyari-nyari tutorial AT Command Nokia 6235. Apa karena kurang pengetahuan dalam mempergunakan SEARCH ENGINE, ato apa karena para master-master programing pada ga ngeluarin jurus-jurus AT Command Nokia 6235 dan nularin ilmu ke programmer pemula seperti saya ini yach..

Mungkin ada temen - temen yang sudah ada artikel atau tutorial tentang AT Command Nokia 6235 mohon kiranya berkenan di kirim ke email saya ( he..he.. ngarep banget :) ).
Sekian dulu .. cuma sekedar short posting saja. Mengusir kejenuhan dalam ber GOOGLE dan FB ria.
Keep Moving....

Thursday, August 28, 2008

Mengatasi permasalahan MySQL error number 1130 - Host "Machine" is not allowed to connect to this server

Connection failed
1130 - Host "Machine" is not allowed to connect to this server.
Keterangan error diatas adalah ketika saya coba-coba belajar membuat program kecil untuk kebutuhan kantor saya. Dikarenakan saya bukanlah programmer handal sempet bingung juga “Kenapa ya kok programku ga mau konek ????”. Dan ketika aku coba pake MySQLFront tampilnya seperti di bawah ini neh.....

Photobucket

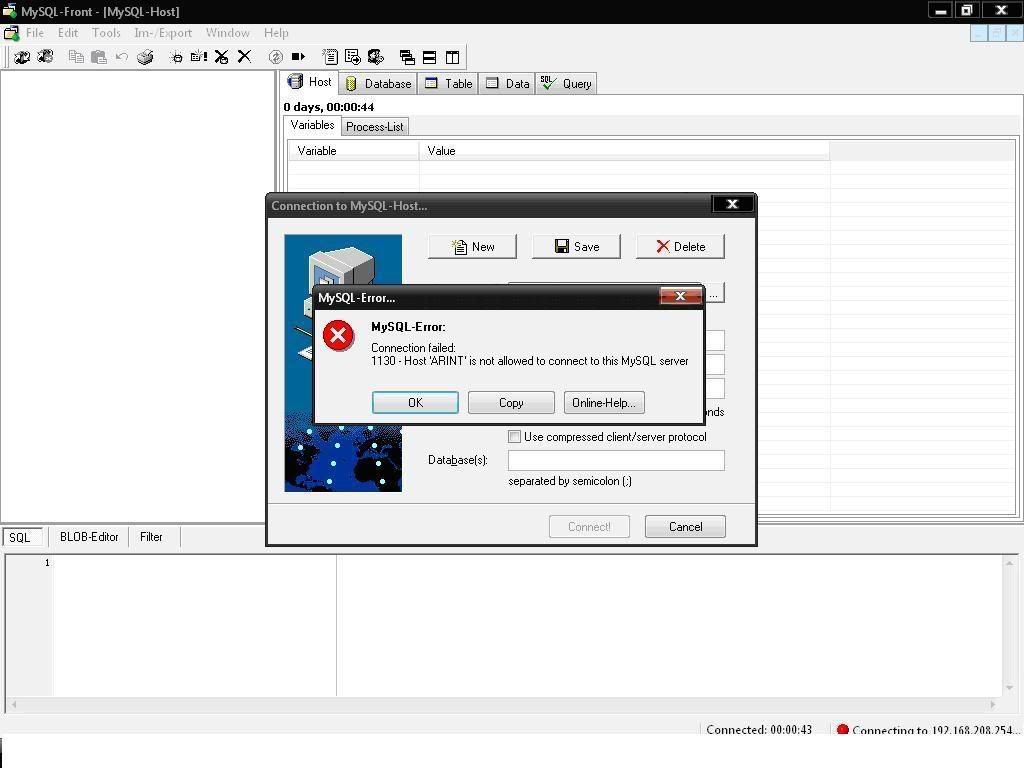
Dan ternyata permasalahan itu dapat selesai setelah aku buka-buka webnya mr.Google (apa ya yang ga bisa di cari dengan google ya????) . Error tersebut diatas dikarenakan user root di MySQL-Server saya tidak mengijinkan koneksi dari manapun kecuali dari localhost atau 127.0.0.1 (CMIIW- Kalo menurut pemahaman saya seh seperti itu.Mudah-mudahan bener).
Dan berikut tips untuk menangani error tersebut.

Ada 2 cara (cara-cara yang lain,saya mohon di kasih tau ya..).
* Cara yang pertama adalah merubah/edit users root yang sudah include ketika menginstall MySQL-server.
* Cara yang kedua adalah menambah user root yang dapat menerima koneksi selain dari localhost.

Berikut untuk cara yang pertama :
1. Buka program MySQL-Front di tempat MySQL-Server anda install
2. Klik File - Connection
    lalu buat koneksi baru dengan meng-klik Tombol New dan setelah itu ketik Localhost atau ketik apa saja terserah anda di kotak isian Description.
3. Isikan dengan :
    Hostname/IP = localhost
    User = root
    Password = password ketika pertama install mysql-server
    Port = 3306
4. Lalu klik tombol Connect.
5. Setelah itu klik Tools - User-Manager
6. Klik pada tab Edit User lalu pilih root@localhost lalu klik tombol Edit User
7. Edit pada kotak isian menjadi :
    Username = root
    Host = % (localhost di hapus diganti dengan tanda persen(%))  
    New Password = terserah
    ReType Password= terserah
8. Klik Save

Dan berikut untuk cara yang ke-II
1. Masih di MySQL-Front – User Manager anda tinggal menambahkan user baru root dengan host %
2. Klik Tools - User-Manager
3. Di kotak isian :
    Username = root
    From Host = %
    Password = terserah
4. Klik tombol Add User
5. User Succesfully Created

Mohon kiranya memberitahukan kepada saya bila ada kesalahan dalam penulisan tutorial diatas.

To be Continued.....

Thursday, July 31, 2008

How to install and configure pgAdmin III for PostgreSQL in openSUSE 11.0

PgAdmin III is the most popular and feature rich Open Source administration and development platform for PostgreSQL, the most advanced Open Source database in the world. pgAdmin III is a comprehensive design and management interface for PostgreSQL database, designed to run on most operating systems. The software is written in C++ and uses the excellent wxWidgets cross platform toolkit. In every environment, pgAdmin III is a native application. The application is executed in binary code, not in a virtual machine, therefore offering excellent performance.


Let’s see how to install and configure pgAdmin in openSUSE 11.0


Mas: http://www.susegeek.com/database/how-to-install-and-configure-pgadmin-iii-for-postgresql-in-opensuse/